Are you tired of seeing ads and trackers while browsing the web? One solution is to set up a Pi-hole on a Raspberry Pi to block unwanted traffic at the network level. Not only is it easy to do, but you can also use Docker to make the installation process even simpler. In this blog post, we will walk you through the step-by-step process of installing Docker Pi-hole on a Raspberry Pi. By the end of this guide, you’ll have a fully functional ad-blocker running on your network, improving your online experience.
Installation steps, variable descriptions, tips and much more can be found on the project’s Github repo and Documentation page.
Quick start
Let’s have a first attempt, without DHCP and any additional extra configuration. We will use Ubuntu on the Raspberry Pi:
peterda@ubuntu:~$ cat /etc/issue
Ubuntu 22.04.1 LTS \n \l
The first step is to create a docker-compose.yml file with the following content:
version: "3"

services:
  pihole:
    container_name: pihole
    image: pihole/pihole:latest
    ports:
      - "53:53/tcp"   # for DNS queries
      - "53:53/udp"   # for DNS queries
      - "80:80/tcp"   # http access to the admin page
    environment:
      TZ: 'America/Argentina/Buenos_Aires'   # Set your timezone to make sure logs rotate at local midnight instead of at UTC midnight.
    volumes:   # Volumes store your data between container upgrades
      - './etc-pihole:/etc/pihole'
      - './etc-dnsmasq.d:/etc/dnsmasq.d'
    restart: unless-stopped   # restart the container after reboots
Then run docker compose up -d to build and start pi-hole. It must be run in the same directory where the previous script has been saved.
peterda@ubuntu:~/scripts/docker_pihole$ sudo docker compose up -d
[+] Running 10/10
 ⠿ pihole Pulled                                                                                                    55.1s
   ⠿ 4b7f5b2a3113 Pull complete                                                                                     40.9s
   ⠿ 7e9169f3f9b4 Pull complete                                                                                     47.9s
   ⠿ 4f4fb700ef54 Pull complete                                                                                     48.0s
   ⠿ 4ce7bf7952c5 Pull complete                                                                                     48.2s
   ⠿ fb82e4c56a4f Pull complete                                                                                     48.5s
   ⠿ a2e7afb87663 Pull complete                                                                                     48.7s
   ⠿ e142cbff6d10 Pull complete                                                                                     51.6s
   ⠿ 3856f68e7375 Pull complete                                                                                     51.8s
   ⠿ b4add2ae2554 Pull complete                                                                                     52.0s
[+] Running 1/2
 ⠿ Network docker_pihole_default  Created                                                                            0.2s
 ⠿ Container pihole               Starting                                                                          25.6s
Error response from daemon: driver failed programming external connectivity on endpoint pihole (a3e99f68b887ec4a2b671b98a91bceec7f0884d557f7308096cf15ce9e5c0632): Error starting userland proxy: listen tcp4 0.0.0.0:53: bind: address already in use
Here I realized that port 53 is already in use. In the same Github repo there is an explanation and solution for the problem.
The issue is that Ubuntu 17.10+ includes systemd-resolved which is configured by default to implement a caching DNS stub resolver. This will prevent pi-hole from listening on port 53. The stub resolver should be disabled with:
peterda@ubuntu:~/scripts/docker_pihole$ sudo sed -r -i.orig 's/#?DNSStubListener=yes/DNSStubListener=no/g' /etc/systemd/resolved.conf
Please note the -i.orig option that make a backup of the resolved.conf file with .orig extension then edits the file in place.
Then we need to restart systemd-resolved:
peterda@ubuntu:~/scripts/docker_pihole$ sudo systemctl restart systemd-resolved
Since we have not configured the WEBPASSWORD variable in our .yml file, we must run this command to find our random password in docker logs to the admin page:
peterda@ubuntu:~/scripts/docker_pihole$ sudo docker logs pihole | grep random
s6-rc: info: service s6rc-oneshot-runner: starting
s6-rc: info: service s6rc-oneshot-runner successfully started
s6-rc: info: service fix-attrs: starting
s6-rc: info: service fix-attrs successfully started
s6-rc: info: service legacy-cont-init: starting
s6-rc: info: service legacy-cont-init successfully started
s6-rc: info: service cron: starting
s6-rc: info: service cron successfully started
s6-rc: info: service _uid-gid-changer: starting
s6-rc: info: service _uid-gid-changer successfully started
s6-rc: info: service _startup: starting
  [i] Assigning random password: jd87LF4P
s6-rc: info: service _startup successfully started
s6-rc: info: service pihole-FTL: starting
s6-rc: info: service pihole-FTL successfully started
s6-rc: info: service lighttpd: starting
s6-rc: info: service lighttpd successfully started
s6-rc: info: service _postFTL: starting
s6-rc: info: service _postFTL successfully started
s6-rc: info: service legacy-services: starting
s6-rc: info: service legacy-services successfully started
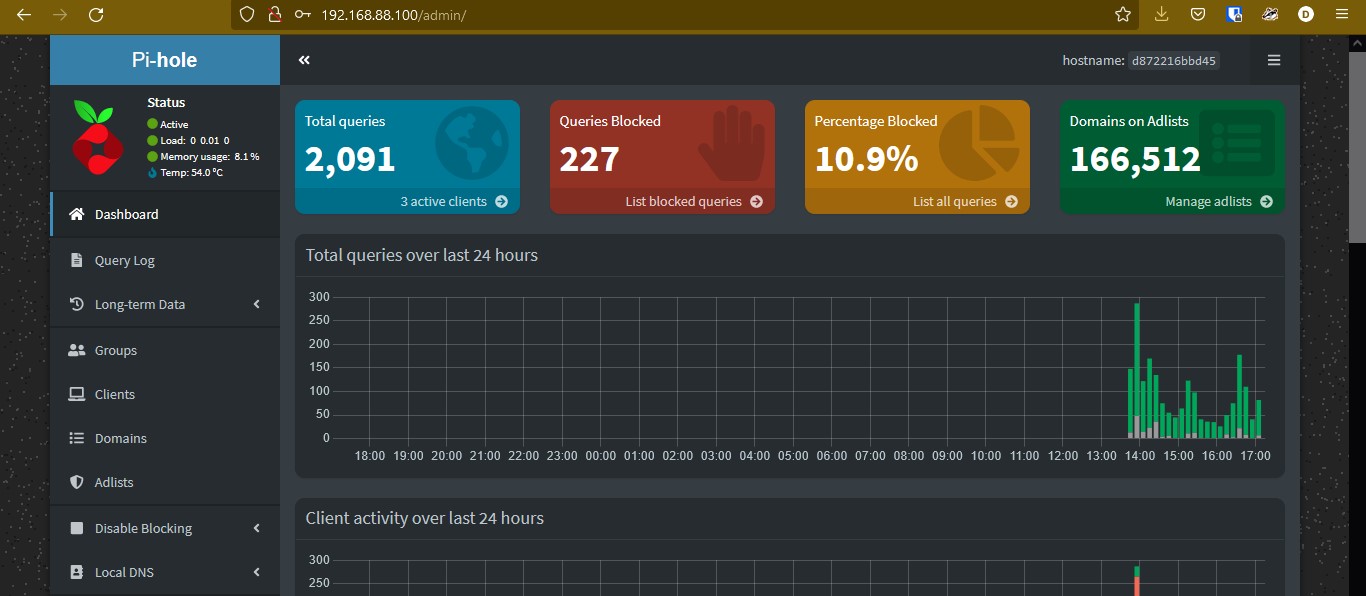
In order to access our server’s admin page, visit http://IP_ADDRESS_OF_YOUR_SERVER/admin. To log in, use the password found in the previous step. You will see something like this:
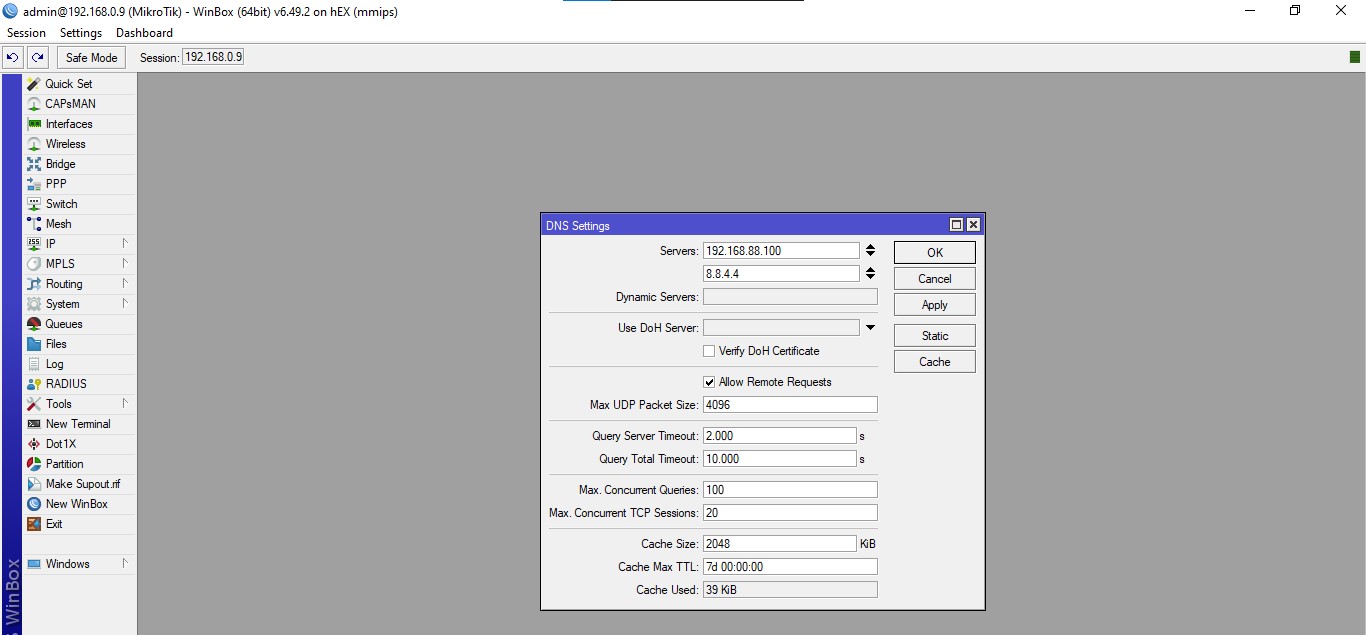
Once Pi-hole is installed, we will need to configure our router to have DHCP clients use Pi-hole as their DNS server. This way we do not need manually set each device to use Pi-hole as its DNS server. I am using a Mikrotik router in my lab and set the DNS as per in the image below: